So, I got several things fixed friday.
One led had actually broken (though only the red part, the green was still working), one had been short circuited by solder (very strange!) and one was simply working but since the key didn't work it was not possible to activate the step.
As for the keys, after unsoldering the left-key I discovered that one of the pins had been bent on assembly. Bending this back out and resoldering the key fixed the problem. I also remembered that, since this key has always been broken, I did a work-around in software to be able to complete the code - I remapped the first step key to work as the left-key. This, however, means that I have to build a new version of the firmware to fix this.
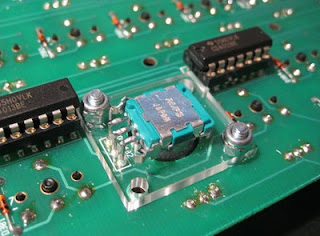
Now, the sampled sounds are another strange case. As no sound could be heard, and it has been working previously, I tried swapping in the old sample ROMs for the new ones (Crash cymbal only). This worked! But even stranger, when the crash started working, the ride cymbal also seems to work. Hi hat is still broken though. I will try swapping in all the old chips to see if they work. If they do, my conclusion is that there's something fishy with the new chips.
When it comes to the output mix, I did some testing with a stand alone headphone amp circuit, and could clearly hear the sound playing - but at a very low volume. I tried swapping the mixing OP-AMP, but this didn't do the trick. However, at the same time I noticed that the separate outputs are very clean and free from digital/powersupply noise! This means that the noise heard when using the headphone output is either introduced in the mixing stage or in the headphone amp itself. I have to investigate this further.
Yesterday I also managed to put together the front panel inner/outer assembly for the first time. After trying several ways to get things together, I came to the conclusion that the parts have to be put together in the following order:
- First, insert the upper part with the display and pots.
- Then insert the lower aluminium plate, but without the circuit boards.
- The keypad then has to be wiggled into place from the right, between the top plate and the spacers extending from the lower plate.
- Now, screw the two plates together using two countersunk screws.
- Connect the keypad to the main keyboard and the main keyboard to the controller
- Slide the keyboard under the front 'lip' of the box and screw it to the bottom plate.
Voila! Everything should be in place :-D
Today I will hopefully start attaching the new wires for the potmeters. I will use a technique called wire lacing to keep the wires together, instead of using plastic strips. This will make the bundle less rigid and saves a lot of room since the thread used (waxed linen cord) toes not protude from the cable bundle :-D (Thanks dad, for learning me how to do this back in the early nineties :-D)
Still pushing for a July deadline, but some issues may have to be worked out in September. Here is a shortlist of what I think is missing:
- Rewire pots
- Change the power for the backlight and side lights
- Recompile the code
- Fix the samples
- Fix the output stage, check introspectiv groups to see what they wrote about the output level being too low
- Get a stereo 1k pot for the Bass drum attach, solder the channels together to make a mono 500Ohm pot.
Also, it would be nice to do the following:
- Figure out where all the noise comes from. Will be a bit hard though.
Showing posts with label enclosure. Show all posts
Showing posts with label enclosure. Show all posts
Wednesday, 20 July 2011
Saturday, 20 November 2010
Front panels and new synths
So, what's new... I ordered the Schaeffer panels around the 15th of October. Today it's the 20th of November, and they still haven't arrived. Actually, most of the panels were finished about a month ago, but a series of unfortunate events means they are yet to be sent from Germany. First, Schaeffer broke one of the panels while inserting some screw rods. Then, after re-milling the part, they received it back from anodizing with loads of scratches on it. They then created the same part for the third time, but those imbecils at the anodizing plant managed to anodize it in the wrong color! so, here's to fourth time lucky...
The silk screening kit arrived about a month ago, and it is HUGE! The screens are more than twice the size I expected them to be - I'm concidering buying smaller screens, as it will be hard working with the large frames. However, if anyone needs two-color posters printed, I'm your man :-D.

The kit while still in its boxes

GF holding the frame - printing press to the right
I've spent the time since the kit arrived building a UV-light box measuring about 90 x 60 cm, to expose the screens before printing. I'm going to put 10 UV fluorescent tubes in it, but so far I cannot get the tubes to light. I suspect that it is related to the tube igniter, but haven't verified it yet.

Now for some other really exciting news: I've bought two other synths! One of them is actually my first factory-new synthesizer ever. It's a special edition version, only sold in Australia, so it will take some time getting here. I intend to use it as the keyboard for my modular project, as it outputs control voltages/gate signals compatible with my modular. Also, as this version is called the "Australian Redback edition", I am concidering naming my modular "Venom" - what better to companion a Redback spider than the stuff that gives it it's sting, eh?
The second synth is a 25 year old classic. A well known but rather inexpensive synth with an intuitive and user friendly control surface.
In all, this brings my collection of full size keyboard synths to 5, including 4 80's synthesizers :-D Got to love them... Add to that two mini-keyboard synths, my modular project, the DIY TR-909 drum machine, one DIY TB-303 and the Novation KS-rack, and I'm starting to build up a rather nice collection. Now, if only I could get around to actually USE them for somehing ;-)
Pics and comments about the two newcomers will be up as soon as I receive them.
Finally, I bought a new motor for my CNC machine, as well as a new Z-axis. It's about time I start using this machine, having spent almost NOK 20.000 on it. First up, I think, is cutting some red perspex (plexiglass) for my rotary encoder/led dials. Exciting!

New spindle motor
The silk screening kit arrived about a month ago, and it is HUGE! The screens are more than twice the size I expected them to be - I'm concidering buying smaller screens, as it will be hard working with the large frames. However, if anyone needs two-color posters printed, I'm your man :-D.


I've spent the time since the kit arrived building a UV-light box measuring about 90 x 60 cm, to expose the screens before printing. I'm going to put 10 UV fluorescent tubes in it, but so far I cannot get the tubes to light. I suspect that it is related to the tube igniter, but haven't verified it yet.

Now for some other really exciting news: I've bought two other synths! One of them is actually my first factory-new synthesizer ever. It's a special edition version, only sold in Australia, so it will take some time getting here. I intend to use it as the keyboard for my modular project, as it outputs control voltages/gate signals compatible with my modular. Also, as this version is called the "Australian Redback edition", I am concidering naming my modular "Venom" - what better to companion a Redback spider than the stuff that gives it it's sting, eh?
The second synth is a 25 year old classic. A well known but rather inexpensive synth with an intuitive and user friendly control surface.
In all, this brings my collection of full size keyboard synths to 5, including 4 80's synthesizers :-D Got to love them... Add to that two mini-keyboard synths, my modular project, the DIY TR-909 drum machine, one DIY TB-303 and the Novation KS-rack, and I'm starting to build up a rather nice collection. Now, if only I could get around to actually USE them for somehing ;-)
Pics and comments about the two newcomers will be up as soon as I receive them.
Finally, I bought a new motor for my CNC machine, as well as a new Z-axis. It's about time I start using this machine, having spent almost NOK 20.000 on it. First up, I think, is cutting some red perspex (plexiglass) for my rotary encoder/led dials. Exciting!

Friday, 8 October 2010
Fall is here - finally!
...not that I enjoy fall that much, but it means I have so much more time to spend indoors without feeling bad about it. And so loads of things are going on at the moment:
Today I got the box and side caps for the drum machine (in fact, I got three boxes, because it was so much cheaper per box if I ordered more than one). Big thanks to Shah for sending them to me, saving me several thousand kroners! The box looks incredibly good - so good that I won't publish any pics before the machine is fully assembled :-)
I am a little bit disappointed with the powder coating though, as it seems they have missed some spots and not put enough powder in other places. But that is me being picky, the over all result is very good. Tomorrow I'll start measuring everything and finish up the panels I'm going to ordered from schaeffer. Hopefully they won't take as much time to create.
Last week I ordered a silk screen kit - a really good one - capable of printing in two colors. It set me back more than a thousand dollars, so I really hope it does the job...
Monday I received a pcb for the "fat controller" midi-to-CV converter, a 15-output controller for my modular project. I have already ordered all the necessary parts, some quite special, from Mouser, DigiKey, Farnell and Elfa. At the same time I ordered the missing connectors and switches for the two extra boxes, with the exception of five midi connectors.
I have also finished soldering about half of the pcbs for the modular synth. Now I have to decide what format to make it - large synthesizers.com, old school, or small, 19-inch eurorack. I have found some really nice rack rails from tiptop audio, and a place in the US willing to sending the to me, if they can find an envelope large enough.
Hmm, anything else? Probably, can't remember.
Oh, btw, gf started working last friday! AND she got me a function generator for my birthday - something I really needed for tuning the modular :-)
Friday, 3 September 2010
Fall is here
Fall is here, and it's time to get this thing working! Today I've found the last (?) glitch in my PCB design - I've forgotten to connect the mixing bus'es to the headphones amplifier. This was the reason I could not get any sound. Fixed that and it works perfect.
Also, I am getting some noise from the crash symbal. Tried to switch the crash and ride cybal rom chips, but the noise still came from the crash. Thus, I believe I need to get a new rom chip.
This means that I have to purchase:
1 head phones pot
1 rom chip, 24c256.
As for other electronics, I think the only thing missing is the red backlight for the LCD screen.
The bottom part of the box is (hopefully) on its way from the US now. Next up is a silk screen set...
Oh, and I've soldered several of the modular synth modules too - still need to make a Midi2CV converter though, in order to test them.
Friday, 23 October 2009
Reduce the number of holes in the box
To reduce the number of holes in the box, and to possibly reuse the design for a TR-808 later, I could use tape-on spacers instead of through-hole ones.
Tuesday, 27 January 2009
Silk screen printing
Here is a store that supplies everything one needs to do screen printing on metal:
http://www.silkscreeningsupplies.com/site
This seems like a good starter's kit:
http://www.silkscreeningsupplies.com/site/799934/product/gpkit1
http://www.silkscreeningsupplies.com/site
This seems like a good starter's kit:
http://www.silkscreeningsupplies.com/site/799934/product/gpkit1
Wednesday, 24 September 2008
Box size corrected
For some reason, making the box out of 1.016mm steel instead of 1.22mm would save me a lot of money. However, this meant I had to change every single coordinate on the box to account for a different outer radius of the bends... This is now finished, next up will be the PCB holes, I/O holes etc.
I've also checked the price of powder coating the box, it's about 200 USD (!). Have to think seriously about that one.
I've also checked the price of powder coating the box, it's about 200 USD (!). Have to think seriously about that one.
Sunday, 21 September 2008
(Almost) final design for back and side panels
I have finalised the design of the side panels and back panel. I will start working on the enclosure shortly.
 Back panel. I quite like the name 'Smallhouse'
 Front panel, more or less complete.
 Two possible side panels. I intend to make these out of 15mm thick aluminium, engrave the logo and sandblast the surface.
 Back panel. I quite like the name 'Smallhouse'
 Front panel, more or less complete.
 Two possible side panels. I intend to make these out of 15mm thick aluminium, engrave the logo and sandblast the surface.
Friday, 19 September 2008
Panel pics
Pictures of the latest panels:

Spacers for the digital givers (tempo dial and mode dial). I've had these made earlier but they turned out wrong.

A giver after mounting but before soldering
After soldering. Seems like I over-engineered again, twice the holes necessary for mounting the parts...

Left dial (tempo) after mounting

Right dial (mode) after mounting

Complete keyboard. I've removed the engraved button caps to prevent damage while soldering etc.

Display. It looks a lot better in real life. I'm amazed by the quality!

Zoom in on the logo. Looks great!
Spacers for the digital givers (tempo dial and mode dial). I've had these made earlier but they turned out wrong.

A giver after mounting but before soldering

After soldering. Seems like I over-engineered again, twice the holes necessary for mounting the parts...

Left dial (tempo) after mounting

Right dial (mode) after mounting

Complete keyboard. I've removed the engraved button caps to prevent damage while soldering etc.

Display. It looks a lot better in real life. I'm amazed by the quality!

Zoom in on the logo. Looks great!
Schaeffer rules!
I received some new perspex panels from Schaeffer yesterday, and must say they blew me away. This time I ordered some brackets and the window for the LCD display. Through some moment of enlightment I decided to put the text engravings for the display window on the reverse side of the panel. This turned out incredibly well and really improved on the overall feel of quality. Pics will be up shortly. However, it made me realise that I much rather want to silk-screen the text on the front panel than engrave it... *sigh* - there goes another 1500 kroner...
Tuesday, 22 January 2008
Box work
I have almost completed work on the box. I've decided to go with thick brushed aluminium sides (10mm), hopefully from hifi2000.it. I will have JD-1 engraved into the aluminium. The sides will look something like this:


I have no clue about the cost, but it will be a lot. As for the bottom, front and back, I will buy this as one piece from emachineshop.com at a cost of about 350$... No engravings or silk-screening though, and I probably have to spray paint the box myself.

Box before folding

Folded box
The top will be made by Schaeffer as usual, and cost 225 euro.

The display window is also from Schaeffer and costs 43 euro:


I have no clue about the cost, but it will be a lot. As for the bottom, front and back, I will buy this as one piece from emachineshop.com at a cost of about 350$... No engravings or silk-screening though, and I probably have to spray paint the box myself.


The top will be made by Schaeffer as usual, and cost 225 euro.

The display window is also from Schaeffer and costs 43 euro:

Thursday, 15 November 2007
Schaeffer parts arrived yesterday
The Schaeffer parts arrived yesterday, and as usual they look fantastic. I love the customer relations at Schaeffer, they call me whenever there is a problem with my drawings and sorts things out in minutes instead of emailing me. This time they worried that the perspex would break apart, but as this was my intention anyway, it turned out fine.
I did however mess up the rotary encoder brackets slightly, the square hole is supposed to go on the other side of the pot. I might have to re-order them later. :-(
Pics will be up shortly.
I did however mess up the rotary encoder brackets slightly, the square hole is supposed to go on the other side of the pot. I might have to re-order them later. :-(
Pics will be up shortly.
Monday, 5 November 2007
Inner front-plates ordered

Rotary encoder brackets, made from Perspex

Lower inner front plate, 3mm aluminium

Upper inner front plate, 3mm black anodized aluminium
Led spacer/aligner, 3mm Perspex
The two inner front plates, one holding the keyboard and keypad, and one for the potmeters, have been ordered from Schaeffer-ag.de. In addition, spacers for the leds and parts for holding the rotary encoders used for tempo and mode select, all made out of perspex are ready and sent to Schaeffer. Total price for everything is 166.88 euros.
Artistic rendering of final product
I've put together a 3D model from my various sketches. This image shows fairly accurately what the final drum machine will look like. I've finished much of the GUI for the display, I've got the key caps and the potmeter caps, and I've tried out some techniques for the display window. The only thing missing before I finish and order the first box parts is the keyboard PCBs.
Have a look at the full version of the picture. It is rendered in 2560 x 2048 and took five hours to render on my P4 3GHz. The scene is made in POV-Ray, a free ray tracer. Except for the textures for the display image and various captions (not including the MACHINEBEATS logo), everything is written (not drawn) as a text file in POV-Ray. The whole scene is 1154 lines of text and took quite a few hours to write.

The name might sound familiar, and I have to admit that I'm guilty of tweaking an existing product name. The same goes for the overall look.
The logo font is a tribute to a synth-centric band, a long time favourite of mine - see if you can figure out which one...
Interface preview
Here is a mockup of the interface. The pots are in the right place and the keys are, well, laid out carefully :-)
The potmeter caps are P670 from RE'AN, incidently the same as Trevor uses on his rack-mounted 9090.
The key caps are made especially for this project by Contech (http://www.contech.co.uk) and cost a fortune. The underlying switches will be Cherry ML (low profile) keys. The end result will be nowhere near this in terms quality...
Subscribe to:
Posts (Atom)